I've seen better.
<small>MUCH better . . .</small>
CAN'T SLEEP MY EYES ARE BURNING
-
Astral Blaze

- Regular Poster
- Posts: 526
- Joined: Sun Jan 11, 2004 3:58 pm
- Location: Wish I knew.
- Contact:
Re: Meh.
Up, close, and personal I take it? *Goes off to mentally flush corrupt images*ImpousVileTerror wrote:I've seen better.
<small>MUCH better . . .</small>
-
Superlance
- Regular Poster
- Posts: 974
- Joined: Tue Apr 08, 2003 11:12 am
- Location: ASMS, Mobile
- Contact:
Ack!
Old server isn't working, so no one on Boardy's stuff is working!
Even though I'm on YDK, I still have another site I can use; YAY!
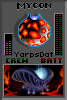
I just made this wallpaper a few days ago; and it turned out much better that I had hoped for: http://fbanimation.xepher.net/fyreBG1280x980.jpg
Old server isn't working, so no one on Boardy's stuff is working!
Even though I'm on YDK, I still have another site I can use; YAY!
I just made this wallpaper a few days ago; and it turned out much better that I had hoped for: http://fbanimation.xepher.net/fyreBG1280x980.jpg

ASMS: The school for the criminally insane.
They put us here to keep up away from the normal people.
You feared Algebra in high school? Integral Calculus is a required class here.

-
Superlance
- Regular Poster
- Posts: 974
- Joined: Tue Apr 08, 2003 11:12 am
- Location: ASMS, Mobile
- Contact:
I opened Photoshop with a blank image.
I colored the entire thing white, the clicked 'View' then 'View Grid'.
I took a screenshot of the grid (print screen button), then pasted it onto a layer behind my image. (all the space behind my character was erased before this).
Then I used the 'Glowing edges' filter on the grid.
Then I duplicated the grid layer, and made one white, and one black; putting the white one on top, and reducing the opacity to 20% or something like that.
To make the circles and lines; I just used a basic line tool; and the circle tool, and then used an eraser 30px smaller than the circle was to erase the center of the shape.
EDIT: Oh, yeah; almost forgot.
The squares were made with the square tool, in black and white; then the layer was set to 'soft light'; and placed between the white and black grid layers.
The red and organge line thing was made with a screenshot of Windows Media Player's Bars and Waves vizulization, 'Scope'.
Last edited by Superlance on Wed Jan 28, 2004 1:11 pm, edited 1 time in total.
ASMS: The school for the criminally insane.
They put us here to keep up away from the normal people.
You feared Algebra in high school? Integral Calculus is a required class here.


That looks really awesome. Do you remember what sound file you were listening to when you took the screenshot?
<KensouX> DEVO-Bot spouts out the mad phrases, tweekin' your brain harder than 35 cocaine cases.

Now Alive Again
Now Alive Again
-
Nishichi27

- Regular Poster
- Posts: 705
- Joined: Fri May 16, 2003 11:44 am
- Location: Tied up in M.E. Charm's basement, at the moment.
- Contact:
Ooo, I love the way you did her middle-red-skirt-thingy!
-Fire our shit!
-But I am Le Tired....
-OK take a nap.
THEN FIRE OUR SHIT!!
==========================
Supaa Disco revolution apocalypse Mahou genki na Tokyo watashi doki doki sugoii mega kawaii baka otaku neo neko wai wai chibi bishonen manga o kudasai hai onegai no uta 25k!!

-But I am Le Tired....
-OK take a nap.
THEN FIRE OUR SHIT!!
==========================
Supaa Disco revolution apocalypse Mahou genki na Tokyo watashi doki doki sugoii mega kawaii baka otaku neo neko wai wai chibi bishonen manga o kudasai hai onegai no uta 25k!!
-
Superlance
- Regular Poster
- Posts: 974
- Joined: Tue Apr 08, 2003 11:12 am
- Location: ASMS, Mobile
- Contact:
Uh.. Nickleback?DEVO-Bot wrote:That looks really awesome. Do you remember what sound file you were listening to when you took the screenshot?
Anyway; I have PSD file with the thing on it; so I can give it to you if I can find it; if you want it.
ASMS: The school for the criminally insane.
They put us here to keep up away from the normal people.
You feared Algebra in high school? Integral Calculus is a required class here.

Well, if I wanted to make outlines coloured, I'd:
-make another layer above the lineart.
-set it to screen,
-draw the colours, with big brush- it would only be visible in places where the black lines were.
-merge the two layers.
(or instead of merging the layers: I'd put the actual colouring (areas) above the both layers, and set it to multiply.
The outlines colouring would still interfere with the background, so I'd rather merge the two layers.)
You are the Non. You must go now, and never return."
"1.Scan in high res 2.tweak with curves,levels or something to clean up the scan (or use channel mixer to remove blue pencil lines) 3.Add colour using a layer set to multiply. 4.Add wordbubbles and text as vector shapes. 5. Merge all layers. 6.resize to the web size. 7. Export/Save for Web" that's all I know about webcomicking.
"1.Scan in high res 2.tweak with curves,levels or something to clean up the scan (or use channel mixer to remove blue pencil lines) 3.Add colour using a layer set to multiply. 4.Add wordbubbles and text as vector shapes. 5. Merge all layers. 6.resize to the web size. 7. Export/Save for Web" that's all I know about webcomicking.
-
Superlance
- Regular Poster
- Posts: 974
- Joined: Tue Apr 08, 2003 11:12 am
- Location: ASMS, Mobile
- Contact:
I color my lines, but I make them so thin that you can't really tell... 
I have a tutorial about the magical art of line coloring here: Color the lines!
Note: This is a Photoshop Elements tutorial.
Oh, yeah; here's the sound wave thing I used on my wallpaper if anyone wants it: http://fbanimation.xepher.net/sound_wave.jpg
I have a tutorial about the magical art of line coloring here: Color the lines!
Note: This is a Photoshop Elements tutorial.
Oh, yeah; here's the sound wave thing I used on my wallpaper if anyone wants it: http://fbanimation.xepher.net/sound_wave.jpg
ASMS: The school for the criminally insane.
They put us here to keep up away from the normal people.
You feared Algebra in high school? Integral Calculus is a required class here.